Transcript
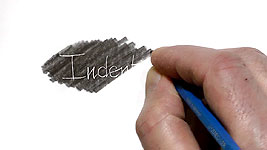
You've probably discovered that an erased area never quite matches the pristine white of your paper. And a line that's been erased, however carefully, can never possess a truly sharp edge. Indenting however, produces white marks with clean, sharp, parallel edges - and it protects the white of your paper as you draw. Let me introduce you to the magic of indenting. You simply apply graphite to indented paper and pure white lines appear. So let's look at the basic tools and techniques...
INDENTING TOOLS
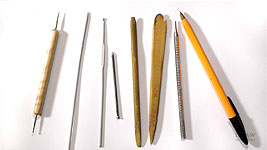
Unfortunately, you can't just drop into your local art store and buy an indenting tool. So you need to use a little creative thought. A popular current choice is embossing tools - the smaller the ball on the tip the better. This is a 0.2mm. I've tried many tools from knitting and crochet needles, to a nail; boxwood pottery tools; a tool my dentist made for me; and, which gave good results, an empty fine-point ballpoint pen. I now use a custom-made stylus made from a large darning needle, also known as a sewing-up needle or bodkin, mounted in an old clutch pencil. And for finer lines I use a blunted needle mounted in the same way. There is only one basic requirement: a rounded or smooth point that will indent but not tear the paper’s surface, so avoid sharp points.
USING YOUR INDENTING TOOL
The goal is to create an indentation, or groove, in the surface of the paper. The result should be a U-shaped valley with steep sides. Then any graphite applied to that area will expose the indent and leave it as a white line. As a bonus - on smooth paper - indenting throws up a burr at each side. They collect extra graphite that form very thin dark lines down both sides, emphasising the sharpness of the edge.
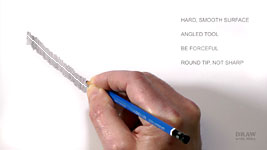
Before you begin indenting, place your drawing paper on a hard and smooth surface. Hard, because you want all the pressure you apply to be transferred to the groove, or indent. Smooth, because you don't want your surface to transmit any texture to the indent. I find indenting works best if you hold your tool at your normal writing angle. Press your indenting tool directly into the paper. Now - using as much pressure as you need to for a good result - pull it back towards you to see what happens. You're just exploring - don’t worry about what happens here!
If your tool begins to tear the surface fibres, at least you now know the limit to the pressure you can apply, or you're using a point that is too sharp. Now shade over the indented area and as if by magic, your indented lines appear before you! Until you're confident with indenting, use the flat face of a 4B or 6B pencil's chisel point. I find smooth papers produce the best results. Here, I'm working on plate-finish Conqueror Diamond White, which is
very smooth, and long-grained, so the fibres don't lift easily. This technique is paper-dependant. It will work on any paper but try to avoid rough, thick or soft papers. They have looser fibres that might lift, and will probably produce lines with irregular or fuzzy edges.
INDENTING LINES AND DOTS
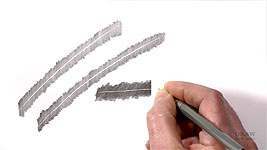
Try indenting a series of straight and curved lines by applying firm, constant pressure with your indenting tool. Then very lightly shade over your lines until they become visible. Now you can see where your indented lines are, shade again - but this time with much more pressure. Apply as much pressure as you can without breaking your pencil's point. Try to destroy those lines! Seriously - you need to know the limit of the pressure you can apply
on the paper you're using.
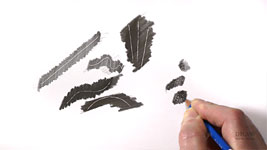
Now try indenting dots... Press hard with your indenting tool and create deep holes - obviously, not right through your paper! This is where the hard surface beneath your paper really helps. Unlike a soft surface, it won't permit your tool to perforate your paper. When you've finished, again, shade over the entire area. Dots are useful for suggesting certain textures, such as forming midground flower heads, water dripping from a raised paw, or splashes flying up from a running animal’s feet. Dot indenting protects the white of the paper while you're drawing - you can be assured of their clarity.
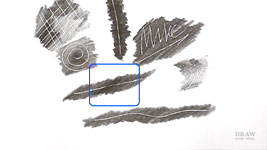
Finally, try indenting a variety of lines, dots, your name, two or more lines that cross each other, and anything else you can think of. This time, when you shade over them, use varying amounts of pencil pressure, so you can see the different effects that achieves. Now study the result carefully. If your shading is dropping into the indent - this occurs when you shade directly across it. I find shading obliquely - at an angle - across the indents works best. And if your indents are breaking down easily - the most common cause is they are too shallow. Use lots of pressure when indenting.
There is, of course, one major problem with indenting - you can hardly see where they are! In areas that don't involve dark, solid shading, I solve that by using a flat-face 6B pencil to
very lightly shade across the indented area. This shading doesn't reflect the correct tonal value of the area; it is simply a marking device. A light application means it can be removed later, or safely drawn over. Now the position of the line is lightly marked, you can forget it. Just be aware of it as you draw and it will appear as you shade. And if you have to use a sharp point, stop your lines at one edge and continue at the other.
PRACTICAL USES
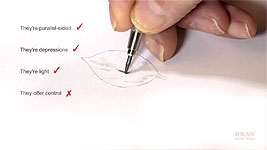
So, what can you confidently use indenting for? It produces a very clean, sharp-edged line with parallel edges, so it will probably look false and unnatural if used inappropriately. This leaf, for example, will have light veins in a darker body. Will indenting suit our purpose? No, it won't. Before you indent, think about the quality of the line. In this case, describe the veins to yourself. They're parallel-sided. They're surface depressions. They're light - not white but you can shade inside them to correct that. They offer control over their appearance. Well, No they don't! If one or more is too wide, you can't narrow it. Or make it thicker if it's too narrow. You can't invisibly fade its taper into the body. And if you decide one side of the leaf needs to be in the shade, you can't easily adjust the values of the indents to match.
Although indenting is a very useful tool, it’s one to be treated with caution. I suggest you always question the need for its use before employing it. And it's not a shortcut - a speedy way of producing a line that might take time to carefully craft. It is, fundamentally, a tool for producing a certain quality of line. If that quality matches the line as you envisage it, then use it. It's ideal for an animal's whiskers; white hairs that overlap black; heavy stitching, in leather for example... lines that are expected to be very regular and flawless. But, remember: an indented line CANNOT BE ERASED - it's a one-time operation - so you must get it right the first time, and use it appropriately.
With that in mind, before you begin indenting, I recommend you draw a very faint guideline following the desired path of the indent. Draw this slightly to one side of the required path, and with a single movement of your wrist, so you know you can recreate the arc with your indenting tool. If you incorporate any of the guideline into the indent, the deeply embedded graphite will be difficult or even impossible to remove. To help prevent this, follow the golfer’s method of practice swings, and take repeated swings with the point of your indenting stylus just clear of the paper. When you feel your hand is following the correct arc, indent the line.
Used properly, and after some practice, you should be able to indent a line that has perfectly parallel sides. The secret to this is maintaining the same pressure throughout the length of the line. If you increase the pressure, the point will sink deeper into the paper and widen the line, and slackening pressure will narrow the line. Any inconsistency in the pressure might cause the line to look unnatural. However, as you'll see, decreasing the pressure is ideal in some situations.
HOW AND WHERE TO USE INDENTING
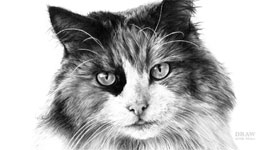
Indenting is ideal for producing white lines and marks in dark areas, such as a cat’s whiskers. Now you understand why I'm so insistent on these indented lines being sharp-edged. Of course, a whisker needs a line with a consistent width that ends in a fine taper. A cat's whisker never just abruptly stops. To produce a clean taper at the end of the line, steadily decrease the pressure until there is no pressure at all at the point where the line ends.
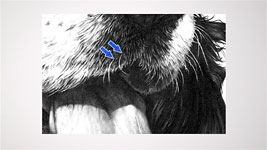
This perfect tapering is an ideal advantage of indenting. For example, I mentioned white hairs that overlap dark or black hair. Here in this Bernese Mountain Dog, the ends of a few of these hairs were indented. I'm not suggesting you indent the entire hair, just its terminal taper, where it will produce a very natural result. My thicker tool created the whiskers - long, consistent in width, and with fine-tapered ends. And I used my narrow indenting tool to produce the tiny top-lip hairs that overlap the tongue and dark interior of the mouth. That takes care of one end of an indent but what about the other? It needs to emerge naturally from the hair. Taper BOTH ends. Then run an HB or 2H pencil into its root, so it blends in.
ADDITIONAL USES
When you feel confident in your use of indenting you can begin to expand its uses. A poodle's top-knot is troublesome to draw because it contains so many weird and wayward fine hairs. I looked for areas where that would be most evident. Then I indented random haphazard lines before drawing began. I didn't shade over them to show their positions - I simply used them to break up the lines I was drawing.
I used the same approach for the frizzy hair of this Irish Wolfhound. Again, I used the indenting to break up my lines, although it was a little more controlled this time. And even more controlled in this Pekingese. Indenting produced the kinked, thin hairs that show against the areas in shade.
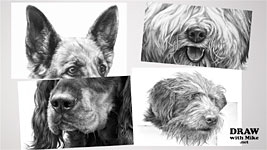
As I said earlier, indenting is probably most effective in areas of maximum contrast. The ends of hairs that are in front of the dark depths in ears. Their sharpness create a lot of depth against the dark interior. Hairs that are on top of noses, such as the white hairs of this Old English Sheepdog. Light hairs that overlap dark hairs, or a dark lip or tongue. Here in this Gordon Setter, indenting was used to produce the top lip’s fringe of hairs that overlap the bottom jaw. And its whiskers, of course. I must mention, the areas above and below the fringe were rendered by drawing around the white hairs, which is negative drawing - and a subject for a future video.
And in Scruff, there are so many fly-away hairs that the ends of almost all of them are indented.
This type of indenting works best in high contrast situations where the indented hairs have a dark or black background. It worked well in this drawing, which was intended to be printed onto fabric, so it needed sharpness and clarity.
As I said earlier, indenting is an invaluable technique, but always look for an alternative first. Except for a few uses, such as whiskers, indenting produces a too-perfect line that conflicts with surrounding natural drawing. But when used appropriately, and treated with respect, indenting can produce some wonderful results.
© copyright: Mike Sibley 2019