Transcript
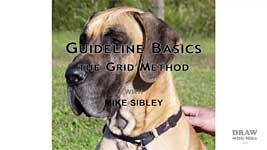
Whatever your level of ability, and no matter how well you shade, you can't produce a good drawing if the basic structure is wrong. We artists have two common problems: ensuring our drawing is accurate and in perspective; and precisely resizing a reference source. In this video, I'll look at one of the most versatile solutions - using a grid.
Now, don't dismiss it out of hand! Gridding is a wonderful tool, and a truly excellent learning aid. However, its use can also be contentious. So, before I begin, let's dispel the myths about using a grid, and other devices, to produce an accurate outline: What you see is NOT a drawing - it's a set of guidelines. A child can use these guidelines to create a colourful painting, or artists can use them to work their magic.
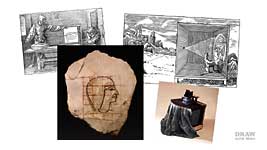
It doesn't matter how the guidelines were produced - they're just a means of fixing the position, proportion, and shape of each element. In the 1920's, artist Walter Sickert based much of his work on photographs, which he transferred to canvas by using a grid. And he answered his critics by saying - the only test of any artist is the finished product, not now they arrive at it. And I'm in complete agreement with that. Going back to the 1400's, Albrecht Durer had his Drawing Engines, and Leonardo daVinci explored the Camera Obscura - as other artists did too. By the time Sir Joshua Reynolds used his Camera Obscura for portraiture in the 1700s, it had been reduced from room-size to book-size. Its use was understandable: he had so many commissions, he needed the device to capture likenesses quickly. The grid has a similar but much longer history. It was being used by the Egyptians 2500 years ago, and 1100 years later, Durer used his Reticulato to explore the true likenesses of foreshortened forms. In essence... he was using a GRID.
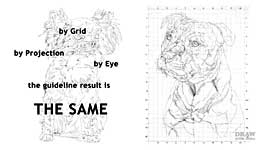
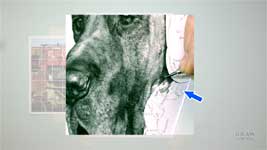
This study began life as a grid, which was then traced and transferred to my drawing paper. Later, I'll show you how that was done. This Chihuahua's guidelines were produced by opaque projection and tracing: The difference? About 2 hours. I saved 2 hours! And if I'd carefully drawn either by eye, I could have saved 5 hours by using projection instead. By grid - by projection - by eye... the guideline result
is the same - just quicker. They're
time-saving tools, nothing else. As artist Bradley Schmehl once said, "If you can draw well, tracing won't hurt; and if you can't draw well, tracing won't help." Copying is an essential process in the creation of art. Even if the drawing retains the size of the photograph, you still need a means of accurately transferring shapes and positions.
The Basic Grid
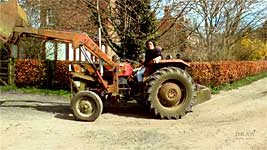
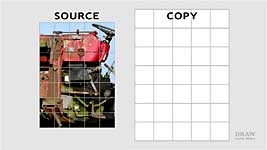
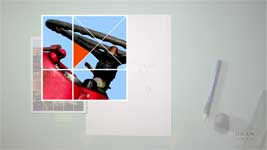
You also need a subject. So I'm going to use a section of my trusty old tractor. It contains edges at various angles and a curve or two. However, instead of using this photo, straight from the camera, I'll use this deliberately washed-out copy as my source. Using Levels in Photoshop, I lightened the darks, so I can see the detail in the shadows. And I'll use a grid to transfer this photo to drawing paper. In fact, you need TWO grids. You apply one grid to your photo or other source material. Usually, I draw lines directly on a printout. You could print a grid onto a clear acetate sheet and use that. Or simply use Photoshop or similar to create a grid on your image. The COPY grid is the one you apply to your drawing paper. Later, I'll show you how to avoid doing that.
I'll begin with the SOURCE grid. I'm going to use 1 inch (2.5cm) squares for this grid. So, measure and mark each 1 inch point around your photo. The smaller you make your squares the more accurate your copy will be. Depending on the degree of complexity, a grid of ½-inch or 1cm squares might be suitable for a 6"×4" photograph. And maybe 1" or 2cm squares for a 10 x 8. You can, of course, enlarge your photo before you print it out. But do be certain the photo is sharp. If you enlarge a photo with questionable focus, you'll be trying to follow wide, blurry edges, which leads to inaccuracy. Double the size and you double the potential for error.
The SOURCE grid is complete but, so you can see it more clearly, I've applied a grid in Photoshop. Now you need to build the COPY grid on your drawing paper. The mathematics are easy, and you have three choices: You can draw a grid the same size as your source grid and your drawing will be the same size as your photo. You can draw a grid that fits your paper. Measure the top of your drawing paper and divide it into the same number of divisions as you had squares - that's 5 in this case. Repeat at the bottom and down both sides. Then connect the marks to produce your grid of squares. That will automatically enlarge your drawing or photo to the correct dimensions. Or you can choose any intermediate size you prefer, or an exact size. If you want to enlarge by 50%, your copy grid 1" squares become 1½" squares - or if you're using the metric system - which is far easier - the 2cm squares will be 3cm.
I want to leave a margin, so I'm enlarging this by 50%. I have five 1" squares across the top. So, my copy grid requires five 1½" squares, which gives a total width for my copy grid of 7½" and the height will be 10½". Your squares
must be square. If they are distorted, your drawing will be distorted too. Now mark off your points across the bottom, and then both sides. If you want to check the accuracy, measure the diagonals. If they both measure the same, your squares will definitely be square. And finally, join the marks to form your grid. Do this
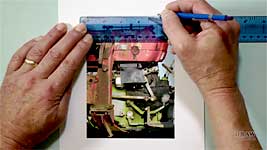
lightly. I'm using a 2B because it creates dark marks that won't indent the paper, and it can be erased completely. If you use a hard grade and make grooves in your paper, they will show through the shading later, even if you think you've erased them.
If you want to enlarge the image, there's something you must bear in mind: if you increase your 1" source grid to, say, 2" on your copy grid, you've doubled the size. But - twice the width and twice the height means you have
quadrupled the time you'll need to complete it - because it is now four times larger in area. And you can double that time again, because the amount of visible detail you'll have to draw has increased too.
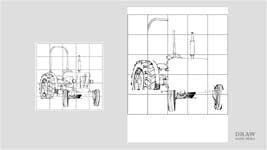
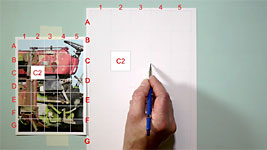
I've completed both grids and it's time to begin transferring information from the reference to the drawing paper. You might find it easiest to tape the source alongside the paper and exactly square to it. It will help you to better judge angles, and I'll explain more soon. Now, carefully copy the lines or edges you see in each square of the source grid into the corresponding square on the copy grid. If you have problems matching boxes between the grids, number them along the short side, and use letters along the long side. You're copying a
line, if your source is a sketch, or an
edge if it's a photo.
Preferably, copy it one square at a time. There's a very good reason I say that: It means you're not paying any attention to
what that line represents. Tell yourself "This line begins a quarter of the way down the left hand edge of this square and goes to a point almost at the bottom of the right hand side". That line can be part of an arm, a coffee pot, an aircraft, a dog's tail - it doesn't matter, it's just a line that you're copying. Whatever you do, don't be tempted to just copy the picture over the top of the grid - you will simply cheat yourself out of learning a valuable lesson. That's because,
gridding teaches your eye to see what is really there and not what you think is there. It trains your eye to properly see angles, curves, spatial relationships - without taking into account. And that's important.
By concentrating on just one square at a time, you divide each feature into unrecognisable shapes - abstract shapes that the brain can't recognise. Recognised shapes invoke "I know all about that", and the naming of parts. "That's a 'mouth' and I know what a mouth looks like..." But you don't! You know a generic stored image - an image that allows you to instantly recognise a mouth - but
it's not your subject's mouth. To see and draw what you're looking at - and not what you think you can see - you have to overcome that naming and recognition system - and gridding helps you do exactly that.
This white edge runs half way up the box and slightly to the right of centre. That's all I need to know to draw it accurately. I do not need to know it's a part of the fuel filter. I know what fuel filters looks like, so I might be tempted to draw what I know rather than see. The same applies to a mouth in a portrait, a daisy in a botanical drawing, or a chimney in architectural study.
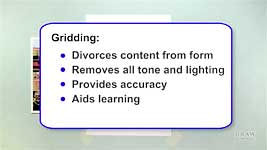
In my opinion, gridding is a blessing to emerging artists. Gridding:
- Divorces content from form As all elements are reduced to pure line, you're drawing abstract shapes that cannot be identified or named.
- Removes all tone and lighting That allows you, the artist, to impose your own rules.
- Provides accuracy of position, scale, and shape where accuracy is critical.
- Aids learning because you can explore, practice, and learn different techniques without first having to learn to draw by eye.
So, gridding teaches your eye to SEE. And if you gradually increase the size of the squares, you'll move away from gridding towards drawing by eye. And your eye will have been trained to accurately see angles, proportions, distances, and negative space.
There are times when working in only one box is not the best practice. For example, when an important edge passes through more than one square. Rather than draw it in sections - which invites inaccuracy - mark the points where the edge passes through each box and then join them. That's not essential with a straight line, but if this was a curve, I'd get a much more fluid and accurate result by connecting multiple points. And if a line has to be straight, use a ruler. But don't use it in your final drawing, because it might look unnaturally precise.
Another problem you'll encounter is a box that contains too much information. It might, for instance, enclose an entire eye. That would be easier to draw - and to forget that it's an eye! - if it was divided between two or more boxes. Whenever a box is complicated, divide that source grid box into four with two additional lines. Then do the same to you Copy grid. That's solved the problem of the nose by dividing it. But the eye is still contained within a single box. So, split that box into four again. Alternatively, you can use crosshairs. Then use negative space to judge shapes and positions. Compare edges against your grid lines. This triangle's vertical edge is half the height of the box, and if I draw this triangle, I will have also drawn the edge of the steering wheel's spoke. Always consider the negative space. For example, rather than drawing this edge, and then this, and this, it's much simpler to just draw the negative space those edges contain.
And if angles are a problem, try this. Make sure both grids are square to each other, as I mentioned earlier. Then use a strip of card, or a ruler or the side of your pencil. Lay it along the angled edge, slide it from one grid to the other, and use it to draw your line.
Finally, look for features that you want to include in your interpretation of the photograph, and the ones that will keep you on course - whether or not you eventually include them. For example, this area is where my boot rubs the casing clean as I operate the clutch pedal. I might or might not include it in the drawing but I will include it in my guidelines. It might help to position another element, break up a dull area, or just tell me where I am. I often include shadows too for the same reason. So I don't later mistake them for physical edges, I use dashed lines for shadows, and arrowheads on any lines marking the direction of growth.
When you're drawing and working on a small area at a time, it's not uncommon to lose your way. The little features you pick out and mark now are the "signposts" you can use to get back on track. And you can decide at that time whether or not to include them as a part of your drawing.
Now the copy grid is complete, drawing can commence. But first, the grid on the drawing paper has served its purpose and needs to be removed. If you used a 2B lightly to draw your grid, you should be able to erase it quite easily with a kneadable eraser or Blu-Tack. However, removing the grid without accidentally erasing part of your guideline drawing is both tedious and very time-consuming. Fortunately, there are ways you can transfer your source to your drawing paper without drawing a grid on it.
The Advanced Grid
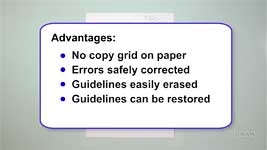
Here's one method I've often used in the past, and it has more than a few major advantages:
- No copy grid on your drawing paper because the guidelines are transferred to it without a using a grid.
- Errors in copying are safely corrected because you're not working directly on your drawing paper.
- Guidelines are easily erased because they're lightly applied and sit on the top of the paper, not deep in the tooth.
- Guidelines can be accurately restored even if you've completely erased them.
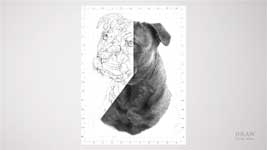
Instead of drawing the grid on your drawing paper, take a suitably sized separate sheet of any white paper. Draw your copy grid on it. Then, copy your gridded source image with no fear of causing harm to your drawing paper as you correct and refine it. As I did for this Staffordshire Bull Terrier.
This next step is the one that gives you all the advantages. Take a sheet of tracing paper. Tape it securely over the grid. And then trace all your gridded lines. This is the end product you're aiming for. An accurate set of guidelines that were produced well away from the drawing paper.
Before we move on... If you are going to draw a series of drawings that are the same or similar in size, there's a quicker way to reach the same point. Take a sheet of white card, slightly larger than the size your drawings will be, and draw your copy grid on it in black ink. Save it - you can use it again. Tape your tracing paper over the grid. I prefer to use Mylar. These Grafix and Seth Cole drafting films, or any similar brand, would be suitable - but any tracing paper will do. Now copy your source image onto the tracing paper, using the underlying copy grid as a guide. Be sure to keep your hand off the surface - rest it on a piece of card - because moisture from your hand can cause some drafting paper to cockle and bend. You really need to ensure it remains flat. The result is the same - your guideline drawing is on tracing paper, but you haven't had to draw the copy grid or trace the copied lines.
Finally, you need to transfer the guidelines to your drawing paper. This is the method I used for almost all of the 52 head-studies I drew for my open edition print collection. Fix the drawing paper to your drawing board in your usual manner. Then lay the guideline drafting film on top, and carefully position it until you're satisfied. Hold it in place - You don't need an old flat-iron... but it is the
most useful tool in my studio! And tape the top edge of the drafting paper to the drawing paper - securely - so neither can move independently.
You could scribble on the back of the tracing to transfer it to the paper - I've done that - but there's a better way - one that keeps your tracing clean. Take a sheet of graphite transfer paper - any type will do, although artist friends don't recommend them, and I've never used one. Well, it didn't exist when I was using this method. But even now, I'd recommend you make your own. I use a second piece of drafting film and thoroughly coat one side with 6B graphite, or a softer grade. It's a useful way to use up your old, short stubs. If you try this, don't be mean - you're making a graphite carbon paper. Keep it in a folder and you'll have it ready for use whenever you need it - just refresh the 6B from time to time. Slip the carbon paper under your drafting film and (with your hand again resting on a piece of card) re-draw over every line using just enough pressure to transfer an impression. I use my indenting tool for this but a hard-grade pencil will do the job just as well. You can safely remove the carbon paper at any time to check your progress, because the drafting film will always accurately return to the same position.
This method has many advantages. Your guidelines can be removed completely with Blu-Tack or a kneadable eraser. And, if you lay down an area of tone, no indented guidelines will reappear to haunt you. And this I found to be really useful - As the drafting film is hinged to the top of the drawing paper, it can be dropped down at any time to check for accuracy. That's especially useful if you've erased an error, and erased your original guidelines too, because you can replace them at any time. And when you lose your way, this is the map that will get you back on course.
Finally, when drawing don't be a slave to your guidelines. At best they provide accurate positioning, at the worst they are simply wrong - you draw
what looks right, and not what the photographs, or your guidelines, say it should look like. Compare these two, and you'll see many changes have been made during the drawing process, especially the neck and base. Guidelines are guides, not compulsory route maps.
© copyright: Mike Sibley 2019