Transcript
If you require accuracy in your artwork - even if that's just accurate perspective - you need an initial guideline drawing to steer you through the process.
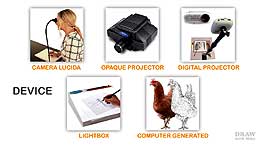
In the previous videos I introduced you to gridding and five more manual ways of creating your guidelines. This time, I'll cover methods that use mechanical devices, such as projectors.
In practice, the better you can draw without these tools, the better you can draw with them. But, when you're creating your guideline drawings, they are time-saving devices for plotting shape and relative positioning.
The Camera Lucida
The Camera Lucida is old technology that's been recently revived. Invented in 1803, it used a small optical prism and was not very efficient. However, recent major improvements have exchanged the prism for an angled half-silvered mirror. It works like this...
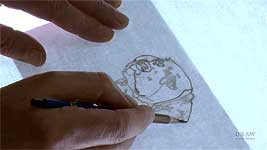
Light from the subject passes THROUGH the half-silvered mirror, bounces off the rear mirror, and is projected onto the top face of the half-silvered mirror. Incidentally, the old prism system inverted the image. But the double reflection results in the image being the right way up. So, when you look through the viewing hole you see the reflected ghost image - as if it's on your paper. Simply trace what you see.
The modern Camera Lucidas project much larger images, but be aware that some brands produce sharper images than others, and offer more functionality. My advice is - you tend to get what you pay for. The model I have is the LUCY, but a similar alternative is the NEO-LUCIDA XL. As you can see, unlike projectors, you don't have to work in the dark. And they don't require electricity, so you can use them anywhere.
You simply clamp it to a table or your drawing board - but it has to be stable. Avoid moving it in any way as you trace. The supporting arm allows you to stand, looking down. However, the Flex Arm of the LUCY, and only the LUCY, also permits you to sit comfortably, looking forwards, or to mount it vertically to work at an easel - with the subject to one side of you. And you only need regular lighting - nothing special, such as a spotlight.
These Camera Lucidas can enlarge to quite useful sizes. Up to 19 x 27 inches (48 by 68cm) for the LUCY. Both the Neo-Lucida and the LUCY come with an optical filter. The LUCY, which I'm using here, has two filters - dark and light - which you can use to adjust the contrast and brightness of the image for optimal copying. To brighten the image, add the light filter. Need it even brighter? Try the dark filter. Combine them, and you'll achieve maximum brightness. But then you might not be able to see your pencil clearly. You're searching for that optimal point where you can clearly see both the image and your pencil lines. Or, if you're outside and the sunlight is so strong you can't see your paper, add a filter in front and you solve that problem. Again, you can use either or both filters.
In addition, the LUCY has an optional accessory - the Photo Projector - which allows you to enlarge photos, pictures or even small objects. It has a fresnel lens for focus, and your photo mounts onto this plate. You can comfortably enlarge a 4 x 6 photo by up to 3 times - that's a useful 12 x 18 inches or 30 x 46cm.
For more information, visit these two sites:
drawLUCY.com and
StudioDesigns.com.
You can use a Camera Lucida to draw from life - be it a still-life, a portrait, or a landscape; from any printed image; or your computer screen. And you can even swap your paper for a digital tablet and trace onto that. It might be the answer you've been looking for. And now for something technically similar but different in operation...and far less mobile.
Opaque Projectors
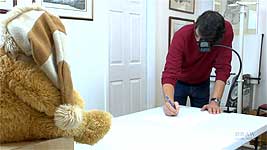
I've used this device extensively - and still use it for certain tasks. Opaque projectors come in many forms. This is my faithful Artograph DB300. It was 3 years old when I purchased it, and that was over 35 years ago. So, it's rather worn but still serviceable.
These projectors work by shining a light on an opaque surface, such as a sketch or photograph, mounted onto the copyboard and projecting it onto your drawing paper via an angled, front-silvered mirror. Some are top-loading, which restricts the size of the image that can be loaded. This Artograph Prism can take up to 7 x 7 inches (about 18cm square). Others are bottom loading - that is, they sit on the image - or a part of an image, so you should, with care, be able to project large images in sections. However, you must ensure your canvas or paper is precisely vertical when using forward-projecting devices. Any deviation will result in distortion.
The simplest solution is to load a printed grid. Project that and any distortion will be clearly visible. They
must be precisely parallel. The grid might also show some distortion towards the outer edges. That's not unusual and can be worked around, but I'll cover that in a later video.
And some, like mine, are rear-loading. This has a generous 10" x 8" (25 x 20cm) copyboard. Artograph's advice is to
not use a sheet of glass inside - due to the heat generated by the lamps - but I've never had a problem. Nothing has ever burnt or singed, and my photos have always remained flat. And that's important, because a curled photo will produce a distorted tracing. That said, the modern LED projectors produce almost no heat at all. And they can often be used in a lit room, but I've always used mine in the evening after dusk.
Size is altered by raising or lowering the main body. Focus is controlled by this wheel, which moves the copyboard towards and away from the mirror. And, when both size and focus are correct, simply trace your photo. I usually trace twice. Once quickly and quite roughly, so I can use it when composing; and then, if it's survived the cutting room floor, I trace it far more accurately. That's the final image I transfer to my drawing paper.
My Artograph, of course, projects downwards, but most modern projectors project horizontally - so you can use them for small-scale works or very large murals. But - a word of warning - If the projector is knocked or bumped, even slightly, it can be very difficult to get the image back into the correct position. Not impossible, but very frustrating.
By now you might have realised that I can also use this projector to resize and position my guideline drawing, and apply it to my final drawing paper. With some imagination the uses of an opaque projector are endless. And in these days of digital cameras and Image Manipulation apps, such as Photoshop - the same might be said of Digital Projection.
Digital Projectors
Digital projectors project an image that can be scaled and traced, and allow you to compose with greater speed and accuracy. The latest digital projectors often have tools to assist you in manipulating an image within the projector, and one of those tools is a grid. That's ideal for making certain the image is precisely square to your paper or canvas. As I mentioned earlier, to avoid distortion, it's essential the two are perfectly parallel.
They're also bright and most can work in a reasonably well-lit room. And LED versions can often be battery operated. As for sources, they can project images stored on your computer, your smartphone, a flashdrive or memory stick, or a tablet. Some will accept camera cards, such as SD and Compact Flash. And most can be mounted onto tripods. And if you're really adventurous, you can even play a movie and pause it at any point to trace a still.
If you have the choice, opt for an LED model. The bulbs last MUCH longer and projector bulbs can be expensive. Some LED bulbs are designed to last 30,000 hours. In comparison, this Epson of mine has bulbs with a 4000 hour life - but this is an LCD projector, which is brighter than current LED models. I need that extra brightness, because I use it to show videos during my workshops and not as a layout projector. But, I'll show you how you can use it for layout - as you can with any other projector. LED types usually produce a sharper image than LCD or DLP models, but in general use, I think you'd find them equally usable.
To scale an image down, you move the projector closer to the paper - which, of course, I can't, because my projector is fixed. So imagine this is smaller and needing to be traced. I'm running this from my studio computer, and I can trace any digital photo it has stored. And that includes any sketch or line drawing. Just scan it and then project its digital file.
Unlike my Epson, many art-dedicated projectors come with several handy functions, such as flip, skew, and rotate. If you're not satisfied with the colour you can adjust it, or switch to greyscale. You can create custom grid layouts, such as the always-useful rule of thirds. And the LED versions are especially versatile. The Artograph Flare 150, for example, has 36 built-in grids; will probably fit into your pocket; and, when powered by its rechargeable batteries, is completely portable.
Mount your projector on a tripod, and simply project and trace for accurate results. And for smaller artworks, mount it vertically on a stand so you can be comfortably seated as you trace.
Now, please note, ownership of ARTOGRAPH has passed to STUDIO DESIGNS who stock the opaque projectors and lightboxes but, currently, that does
not include any of the art projectors mentioned in this video.
Whatever brand of projector you choose, bear in mind that the smaller units produce less light, so if you need to create large-scale works, you're better off with a larger, brighter model.
Lightbox
If your reference photos, or your guidelines, are the same size as your intended drawing, at some point you'll need to transfer them to your drawing paper. A Lightbox might be your best choice. They usually consist of a translucent Plexiglas top lit evenly from below by fluorescent or LED strip lights.
I don't have, or use, one... but I do have this handy LED light panel. It's a suspended ceiling office light that I once used as a video light. All I've done is add a surface-mounting box and a plywood back - and now it's suitable for the job. In fact it's an entirely suitable 2 feet square lightbox for less than £30 or $40.
You place your reference on top of the light box lay your paper over it and trace what you see. Nothing could be simpler. Well, actually, it could. You could simply tape your reference and paper to a window on a lovely sunny day - and I've done that. It works. You could even display the reference on your laptop. Pump up the brightness to maximum; place a piece of paper over the screen, and trace.
Of course, this assumes that your paper isn't totally opaque. After all, light has to be able to pass through it. But, if it is opaque, don't despair. Just use a thinner sheet of paper, or tracing paper, to copy your image, and then transfer that to your drawing paper. I showed you a few ways to do that in a previous video. But you probably won't have to. You might be surprised how efficiently lightboxes can shine light through quite thick papers.
This is 250gsm Conqueror Diamond White - similar in weight to 90lb watercolour paper. I can easily trace a line drawing placed under it. But it's on the edge of 'possible' with a photo. However, I can simply use a sheet of 80gsm copy paper to trace the photo. Then I have the option of tracing the tracing through my Conqueror - or using any other transfer method.
As long as you want to copy at a 1:1 scale, lightboxes are very versatile devices. And, with a little imagination, it's easy to adapt various pieces of equipment to form one. Whether your lightbox is a purchased unit or home-made - they're all good at quickly transferring a reference to paper.
Computer Generated
Sometimes, however, a need arises to speedily convert a photo into a line drawing. Perhaps you need to quickly try out an idea. Or you need to remove all colour, lighting, and form. You could fire up your lightbox and trace the photo, but I'll show you a much quicker method. Or maybe you're composing a scene that combines a photographed background with a line-drawn feature. The problem is - you're finding it difficult to visualise the finished result. So, what if you could quickly reduce the background to line? Well, in Photoshop, you can. I'll show you how this is done, but it is NOT the lazy artist's way to trace. It does save time, and it accurately fixes positions and shapes, but it doesn't teach you anything about the content. It needs handling with care.
So, with that in mind, here's one way to create a line drawing in Photoshop.
Although I have Photoshop CS6, for clarity, I'm using my 20-year old version to convert this Owl. It's the version I use every day, and if it works in this, it should work in your version too - even if that's Photoshop Elements. And to speed up the job for you, I'll give you all the keyboard shortcuts.
Two things first: as always - I hope! Duplicate the photo for safety and put away the original. And - if necessary - unlock the Background layer. Double-click its Layers icon and choose 'Layer 0', or - let's undo that - copy it by dragging it to the New Layer icon. Now let's get to work...
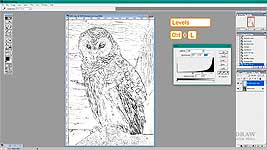
[LEVELS / AUTO-LEVELS]
You can use Levels (CTRL+L) to increase the contrast and achieve the clearest edges. However, I'm going to try Auto Levels first because it's often quicker. You can use IMAGE > ADJUST > AUTO LEVELS or CTRL+SHIFT+L. That's better.
[HUE & SATURATION]
Now I'll see if increasing the saturation helps. You can use IMAGE >ADJUST > HUE & SATURATION but I'll use CTRL+U. +52 looks to be about right. That's a definite improvement, but let's see if sharpening will improve its clarity even more.
[SHARPEN]
You should be aiming for good sharp edges, not a good photo. This is looking OK, so let's move on:
[HUE & SATURATION]
Now desaturate the image to remove all the colour. You can use IMAGE > ADJUST > HUE & SATURATION, but I prefer to use CTRL+SHIFT+U for speed.
[DUPLICATE]
Duplicate the layer. You can drag it down to the New Layer icon. But let's undo that, because it's much quicker to use CTRL+J.
[INVERT]
Now invert the new layer - turn it into a negative - which is IMAGE > ADJUST > INVERT or CTRL+I.
[BLEND MODE]
Next, change the blend mode in the Layers palette to Color Dodge. You're subtracting a negative from the positive below it so - if the screen turns white - Don't panic! OK - now we'll create some interaction between the two layers. I'll show you two options - there might be others too - so, first, let's try:
FILTER > OTHER > MINIMUM
Leave the Radius value set to 1 pixel. That looks OK, but I'll undo it (CTRL+Z) and try the other option you can use.
FILTER > BLUR > GAUSSIAN
Drag the slider and the edges will begin to appear. As you blur more, the lines become wider and darker. Narrow is better so, for fine control, click in the radius box and you can use the keyboard arrow keys to find the optimum setting.
I find somewhere around 2.0 to 2.5 often works well.
[CTRL+E]
That looks good. But we need to fix it like that, so Merge the two layers with LAYER > MERGE DOWN or its shortcut CTRL+E. Now we can try to improve the result. Use Levels to darken the lines or lighten to remove unwanted detail. And you can use the Dodge and Burn tools too if you need to fine-tune an area.
If you compare them, the Gaussian Blur usually produces the sharpest results, but it's worth trying both.
In practice, this and the other methods are time-saving devices, but don't be fooled into believing you know anything about the subject - you
don't.
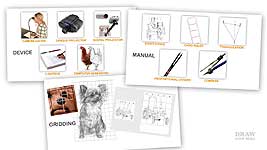
These will teach you how to copy - These will teach you how to draw - And this will help to bridge the gap.
The ideal... if you're using any DEVICE from this group, is to apply the benefits of the MANUAL group. Copy - but stop to think about
what you're copying. And how you might modify it to better suit your intended use of it. And that's the subject of the next video.
© copyright: Mike Sibley 2019